Yubisuri = Yubikake
The yubisuri is also known as yubikake. I also like to call it a “finger sock” because it’s easier to remember. The purpose of the yubisuri is to provide more agility when playing the shamisen. This small accessory prevents your hand skin from touching the neck while gripping positions, allowing your fingers to glide smoothly along the sao while playing. The yubisuri is normally worn on the left hand; on instruments converted for left-handed players, it is worn on the right hand.
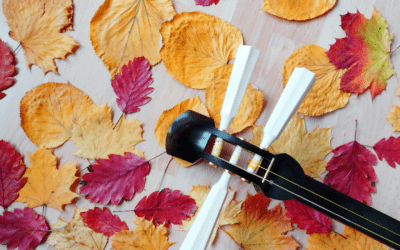
A yubisuri consists of two elastic loops connected by an elastic bridge. Machine-made yubisuri are knitted, while handmade ones are often crocheted.

machine-knitted

knitted

crocheted
models
There are basically two different yubisuri models, which differ in the width of the finger loops. The model typically used for shamisen with a wide neck (futozao) has two equally wide loops to provide more contact area on the neck. The other model has one very narrow loop and one wide loop: the narrow loop is for the index finger, and the wide loop is for the thumb. This model works well on instruments with a narrow neck (hosozao), because a wide loop on the index finger can accidentally touch the thin string and mute the note.
Personally, I make my yubisuri with a medium-width loop for the index finger. This gives me both agility and a large contact area on the neck. I don’t hit the thin string, and my skin doesn’t touch the wood.

Model 1
Model 2
Wearing the Yubisuri Correctly
If the loops are different widths, the narrow loop goes on the index finger. For a yubisuri with equal loops, it doesn’t matter which way you wear it.
Hold the yubisuri so that you can see both loops from the inner opening — not “upside-down” like a hammock. You want to slide your fingers from the inside into the loops:


Step 2: Position them in the middle of the yubisuri.

Step 3: Slide your fingers outward into the loops.

Step 4: Pull the loops down until they sit firmly.
How Not to Wear It
As simple as it seems, there are two common mistakes:

Error: The narrow loop belongs on the index finger.

Error: Always slide fingers in from the inside out.
The Right Size
Hand sizes and types vary greatly, so yubisuri come in different sizes. The loops should fit comfortably, like a cozy sock. If a yubisuri is too tight, it’s often impossible to get your fingers in properly. If you manage to squeeze into a too-tight yubisuri, it interferes with playing because you can always feel it. Loops that are too loose feel floppy and distracting.
The connecting bridge should be long enough to allow the hand to spread easily. A bridge that’s too long feels cumbersome; a bridge that’s too short restricts your span. This becomes especially noticeable in grips like 6–9 with the index and ring fingers, where the index finger really stretches backward.

loops too tight

loops too wide

bridge too long

bridge too short
Personal Preference
There’s no “right” or “wrong” when it comes to fit. Each player must find what feels comfortable and helps with playing. Personally, I prefer firmer, shorter bridges and snug loops, because I’m distracted if the yubisuri moves. But many players feel restricted by tight loops. Like so often in music, it depends on personal taste. The most important thing is that you don’t notice the yubisuri and that it doesn’t distract from playing — and that you wear it the right way.
If you don’t yet have a yubisuri or need a different one (or just want another color), you can find them at the Shami-Shop (special small or large sizes can also be custom-made).

good fit

good fit
Watch the video here:

Newsletter abonnieren
Am Ende jeden Monats gibt es einen frischen Newsletter mit einer Übersicht aller neuen Artikel und Videos. Dazu gibt es alle anstehenden Terminen für den kommenden Monat. Plus hin und wieder ein nettes Schmankerl 🙂
Also: Gleich anmelden!