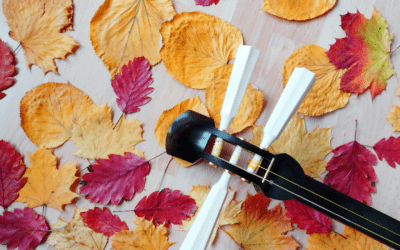
Loosening the Strings
Before taking the neck apart, the strings need to be loosened. Luckily, you don’t need to unwind them from the tuning pegs (Itomaki). Instead, detach the Neo along with its attached strings from the Nakagosaki, which protrudes from the bottom of the Dou. Loosen the Itomaki slightly until the strings feel very relaxed. Now the Neo can be easily pulled off the Nakagosaki.

The looser the strings, the easier it is.

Pull the neo off the nakagosaki..

.. while keeping the strings under slight tension.
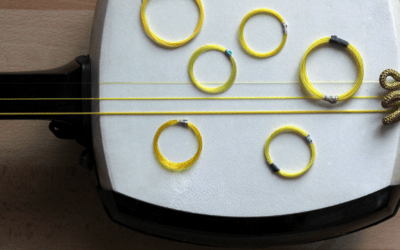
The strings are then wound around the pegs at the Tenjin. There are various proven winding patterns that work well—crossed or just around is ultimately fine. The larger the loops, the better. The winding doesn’t need to be tight; it’s just about storing the strings neatly and out of the way. Finally, the Neo can be secured. If you have an Azuma Sawari, you can attach the Neo to one of the loops on the screw. If the pegs are very slim, you can loop the Neo over one peg with the thick loop.

Pull the strings to the right side.

Wrap the strings loosely around the pegs.

Lastly, secure the neo.

The screw at the back of the azuma sawari is perfect for securing the neo.

Simply latch the loop onto the screw.
Disassembling the Neck
The neck can now be separated into its three pieces. The last piece of the neck (shimozao) usually remains in the dō. The neck is precisely fitted, making the joint very tight and creating slight tension on the skin due to the enclosed air. To maintain this and for practical storage, the last part of the neck is usually left in the body.
The connections between the three neck pieces are made so precisely that they fit firmly, and the transitions are barely noticeable. On older instruments or ones that have been frequently assembled and disassembled, material fatigue may occur at the joints, making them slightly looser and easier to detect by touch. This actually makes disassembly easier.
Loosening the Joints
If the neck joints aren’t very tight, disassembly is easier. Fresh joints may require more patience. Besides age and wear, weather conditions also affect the tightness of the joints, as the wood expands and contracts with climatic changes.
You can start at the top or bottom joint; the technique is the same. The gentlest way is to hold the lower part of the joint with one hand and tap the opposite side of the joint gently with your palm.

Tap the joint with a flat hand.

No strong force required.
Repeat with the other joint.

After a few taps, the pieces start drifting apart.

Fully separated joint.
Special Case: Preparing the Dō for Shipping
If only the dō is being sent to a specialist for re-skinning, the last part of the neck must be removed. Tapping with your hand usually won’t work here. Instead, there’s a simple trick: hold the dō with one hand and the protruding part of the neck with the other. This works whether the neck is fully assembled or completely disassembled. Using a peg, tap once firmly on a hard surface—the neck should separate from the dō. The process may seem abrupt, but it is the fastest and safest way. In the video below, I demonstrate how easy and harmless this process is. To prevent accidents, make sure the dō is secured with one hand so it doesn’t fall and get damaged.
Now the instrument is ready for mobile adventures!
Watch the video here: