Stringing Shamisen Strings — the Right Way
Sooner or later everyone has to tackle the task of putting new strings on their instrument. The traditional way of attaching the string to the neo is incredibly elegant and simple. You form a loop, slip it over the neo’s eyelet, and tighten it. Simple, elegant, fast — perfect. Since this is difficult to describe in words, I strongly recommend watching the video at the end of the post.
Three strings, three quirks:
All three strings are attached in the same way. But each one has its own little quirks and tricks that can save you effort and frustration.
I always secure the string at the neo first before winding it onto the itomaki. But you can also wind a bit of the string onto the peg first and then fasten the other end at the neo. Like with so many things, there’s no strict right or wrong here — everyone has to find what’s most comfortable or quickest for them.
Here I’ll show you the method I’ve chosen as best after stringing countless shamisen.
If the shamisen is completely bare, with no strings at all, I always start with the thin string, because it’s fussier to thread through the
I secure one end of the string to the neo first, then wind the string onto the
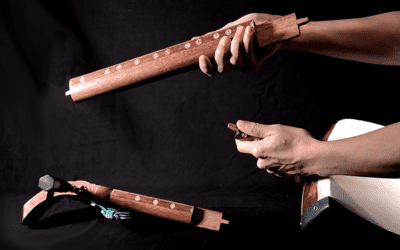
Attaching at the neo
Insert the end of the string from the top (from the dou/corpus side) through the neo’s eyelet, about a finger’s length.
Make a loop — or better: a loose curl — by forming the end into an “O” and laying it on top of the string. Direction doesn’t matter.
Where the string crosses, pin it with your index finger from above and thumb from below — like grabbing the loop with your finger tweezers.
With the loop firmly pinned, flip the string loop over the neo loop, then pull on the long end of the string (the side toward the dou) to tighten it.
As the loop tightens, try to shuffle the whole thing down far enough so that the knot ends up beneath the skin.
Simple trick: Because of the tension, the knot at the neo can easily slip on the thin string. To prevent this, you can tie a simple knot at the string’s end before attaching it.
Winding on the itomaki
The thin string (san no ito) doesn’t have this advantage. It’s smooth and tends to slip out of the hole unless you take precautions. A classic method is to tie a knot after threading it through, but that can be a pain later when changing strings.
A bit fussier, but more elegant:
Thread about a centimeter of the string through the peg’s hole.
Press the short end down along the length of the peg with your finger.
Carefully turn the peg so the winding string pins down that little tail.
Make sure the following turns also cover the short end, so it holds firmly and doesn’t stick out.
Undoing the knot
Simply loosen the string at the peg (or, if it’s already broken, it’ll just hang there) and pull apart the neo loop where the string is hooked. This releases the loop, and the string comes off with ease. Pure elegance!
Watch the video here: